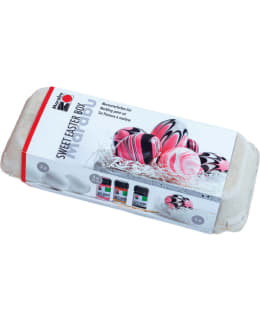
The Sweet Easter box egg cell contains 7 eggs, 7 sticks, white decorative grass, 3x15ml marbling colors (shades of pink, black and crystal). Packed in an eggcell. Marbleize anything easily! Dip, spin, ready! The quick-drying Easy Marble marbling paint set is especially suitable when you dip plastic, glass, acrylic, paper pulp or blown-out eggs into the marble paint. Also suitable for polystyrene, metal and horizontal marbling of paper. The colors are water- and lightresistant. Single shades and a convenient marbling assortment are available. Create stunning marble surfaces in just seconds! Mix the marbling colors in a container of water and dip the object to be painted a little while swirling it in the Colorant. Lift the item and let it dry for 15 minutes. After the marbled object has dried, you can wipe it with a damp cloth. Attractive and fresh colors Suitable for plastic, glass, acrylic surfaces, wood, paper pulp, eggs, candles, metal, polystyrene and paper. Suitable for creating a marbling surface by convenient dipping. The assortment also comes with handy instructions for use. Marble the surface of the object as follows: Fill the bowl with cold water. Shake well 2-3 different shades and slowly drop the dye onto the surface film of the water, in the middle of the container. Drag e.g. a stirring stick immediately through the colored surface. Dip e.g. polystyrene balls into the water so that they are completely covered by the colored water. Remove quickly and let dry. ready MARBLING WITH EASY MARBLE COLORS 1. When using Marabu marbling colors, it is a good idea to cover the inside of the container with plastic. When marbling by dipping, you should choose a tall container as the marbling basin, e.g., a milk can or a glass can, which is not much larger in diameter than the object to be marbled. 2. Put hand-warm water in the container. If the water is too cold or hot, the color will too quickly make a film on the surface of the water. 3. Shake the cans well before use so that the color and solvent mix properly. Drop a few drops of Easy marble color on the surface of the water with the pipette cap of the bottle. Preferably use only two different colors so that the patterns stand out best. First drop a couple of drops of colorless color on the surface of the water and then a few drops of other colors. Colorless works as well as the other colors and its use is recommended, as it clarifies the marbling pattern. 4. Use a wooden stick to make patterns on the color surface immediately after you have put the color on the surface of the water. 5. Dip the object to be marbled under water immediately after patterning, rotating the object slowly all the time. Lift the marbled object from the color mixture and let it dry. When marbling paper, place the paper on the surface of the water immediately after patterning and let the colors soak in for a while. After that, lift the paper off the surface of the water and let it dry. 6. Before marbling a new object or paper, remove the previous color from the container by wiping around a paper or wooden stick, because when solidified, the color forms a film on the surface of the water. When marbleizing paper with Easy Marble colors, the maximum size of the paper is A5 and the size of the basin is slightly larger than the paper. Note! Do not pour the color-water mixture down the drain.